 technology
Although connecting two iPhones to the same Apple ID has its advantages — including expanding your or a partner’s access to your documents, spreadsheets and presentations — unpleasant surprises can arise such as unintentionally revealing contact and calendar information and mistakenly sending texts from the wrong number. Whenever associating two iPhones with the same Apple user account — whether to share contacts and calendars or enable sharing your account with an assistant or partner — ensure you understand the tradeoffs as well as the benefits.
The experience of associating your Apple ID with more than one smartphone is not much different than adding an iPad or Mac to your Apple account. Other than another mobile telephone number being associated with your Apple account — an anomaly that also occurs whenever associating a cellular-enabled iPad with your Apple ID — the process and settings are similar.
Jump to:
The first surprise you may encounter when associating your Apple ID with another iPhone is all the data and settings from your first iPhone becoming available on the second smartphone. For this reason, you must pay careful attention when setting up a second device.
The second surprise you may encounter is receiving messages on your first phone that were actually sent to the second device’s telephone number; this is due to the way changes between different Apple devices sometimes synchronize. So don’t breeze through the seemingly innocuous questions the second iPhone setup process presents when associating your Apple ID with the device — take time to consider the settings you select.
If Messages become associated with the wrong telephone number, open Settings on the iPhones and select Messages. Within the Send & Receive section (Figure A), you can enable or disable the telephone numbers and email addresses associated with the device and your Apple ID. Tapping the corresponding entry adds or removes a checkmark, confirming the source — whether it’s a telephone number or email address — is now associated with the Messages app.
Figure A
Just as with messaging, surprises can occur with FaceTime. You may not want the new iPhone telephone number to receive FaceTime calls. Avoid surprises that occur when associating the wrong telephone numbers or email addresses with FaceTime on the second device by reviewing the corresponding configurations.
Open Settings, select FaceTime and disable or enable sources as you want. From within the FaceTime settings, you can also specify the telephone numbers and email addresses at which FaceTime can be reached on that device. Just tap the entries that appear to enable or disable accessibility for each.
Apple’s iCloud settings and synchronization become more complex when using the same Apple ID on two iPhones. Depending upon your specific needs, you may need to adjust iCloud configuration on the second iPhone.
For example, you may not want the second iPhone to automatically back itself up to iCloud. Or, you may wish to confirm the second device’s photos automatically synchronize with your iCloud account.
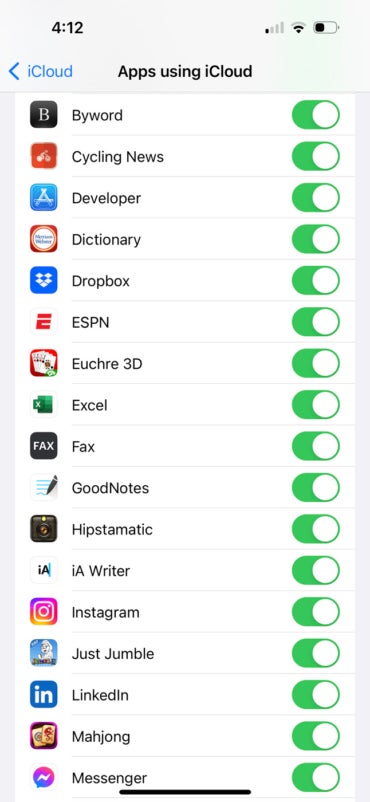
Review and confirm each individual iCloud setting on the second iPhone carefully. Among the individual options you can enable or disable are Photos, iCloud Drive, iCloud Backup and Mail, among others. To configure granular adjustments, open Settings, tap your Apple ID, select iCloud and tap Show All within the Apps Using iCloud section. You can enable or disable app iCloud synchronization on either iPhone by sliding the provided radio buttons accordingly for a host of apps including Contacts, Calendar, Reminders, Pages, Numbers and Keynote.
Apple’s iCloud permits configuring a wide range of third-party app synchronizations. When connecting a second iPhone to your Apple account, consider whether you wish to retain or change an app’s iCloud synchronization settings and whether you intend for the second iPhone to automatically access and synchronize the corresponding app’s data, too, using iCloud.
For third-party apps to synchronize, you must first install the app on the second iPhone. Next, you need to enable the corresponding radio button within the iCloud app section (as described above and shown in Figure B). Among the third-party apps you might sync with iCloud, especially to permit using the second iPhone to access, review and even edit apps’ files, are Byword, Excel, iA Writer, PowerPoint and Word.
Figure B
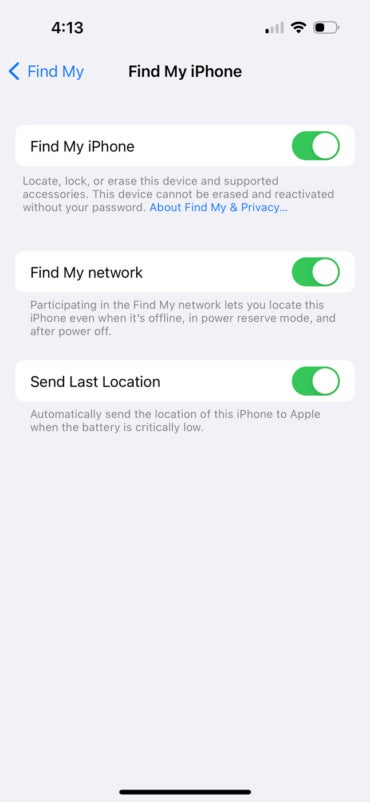
Apple’s Find My feature greatly simplifies tracking a lost device; it also reveals your location to anyone with access to your Apple account, including whoever is using the second iPhone with which you’ve associated your Apple ID.
Carefully consider and set the Find My feature to prevent privacy issues. When enabled, the feature permits tracking the location of the second device associated with your Apple ID just as it enables the person using the second device to track your location using the first iPhone associated with your Apple account.
To enable or disable the Find My feature, open Settings, tap your Apple ID then select Find My. The iPhone will display its Find My status within the Find My iPhone section (Figure C); tap the entry and slide the radio button to either enable or disable the feature as needed.
Figure C
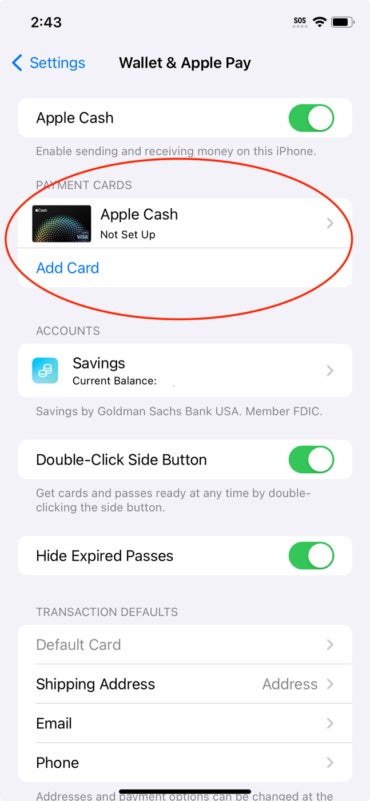
Whenever associating a second iPhone with your Apple ID, consider your Wallet and Apple Pay intentions. If you want to enable the second iPhone to have Wallet, Apple Cash and Apple Pay capabilities, enable the feature; if not, disable the option.
Review and confirm these payment options within the Wallet & Apple Pay section (Figure D). The option is present within an iPhone’s main Settings menu. iOS provides options to enable or disable Apple Cash, confirm payment methods associated with your Apple ID and remove individual entries, such as Apple Card and credit cards you’ve previously associated with your Apple account and synchronized to iCloud.
Figure D
Associating your Apple ID with two iPhones doubles the risk your device could be lost or stolen, and your data could be accessible to unauthorized parties; so, you should carefully consider the security precautions you select.
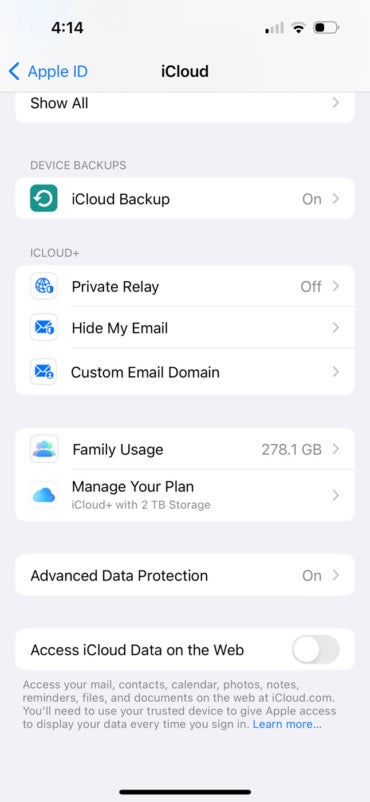
For example, if you enabled Apple’s Advanced Data Protection on your first iPhone, you should confirm the feature is functioning properly on the second iPhone you’re associating with your Apple ID. The same is true for requiring a complex passcode on the second iPhone connected to your Apple account — you should configure an equally complex passcode on the additional device.
Confirm whether Advanced Data Protection is enabled on an iPhone running iOS 16 by opening Settings and tapping your Apple ID. The Advanced Data Protection status is displayed at the bottom (Figure E). To enable Advanced Data Protection, which increases the security of your iCloud data, follow Apple’s instructions.
Figure E
To set or increase the security of an iPhone’s passcode, open Settings and tap Face ID & Passcode, where you can enable or increase the strength of the passcode required to access the device. You can also adjust other settings, including requiring the passcode immediately and specifying the iPhone erase its data after 10 failed passcode attempts.
Connecting your Apple ID to another device associates your Apple user account with that smartphone, tablet or computer; this means changes made to Notes, Contacts, Calendars and even Music libraries and Podcast settings can replicate across all the devices associated with your Apple ID. Be sure to carefully consider the ramifications of connecting your Apple ID to another device before you do and, when proceeding, carefully configure Apple account and iCloud settings on all the devices associated with your Apple account to ensure the setups work as needed.
24World Media does not take any responsibility of the information you see on this page. The content this page contains is from independent third-party content provider. If you have any concerns regarding the content, please free to write us here: contact@24worldmedia.com